


First, I opened new file with A3 sized canvas. Then, I dragged my scanned sketch file from My Scans to the Adobe Illustrator CS2 window. Adjustments of positions are made in this step.
 I set the template's opacity to be lower so that i can see the grids clearly.
Then, I made a new layer named Sun.
Underneath it, I made sublayers named Sunbody and Sunray.
On the Sunbody sublayer, I drew the core of the sun using pen tool.
Fill: Red, Stroke: Black
 On the Sunray sublayer, I used the pen tool to draw the fiery rays of the sun.
[Lots of editing and anchoring involved ><] Fill: Yellow, Stroke: Black

Using ellipse tool, I drew a circle in the background layer i've made earlier.
I filled the circle with yellow and set the opacity lower so that the template and grids are visible.

On a new layer named Land, I made 2 sublayers named Soil and Crack.
On the Soil sublayer, I used pen tool to draw the land.
Fill: Mocchacino, Stroke: Black
 On the Crack sublayer, I used pen tool to draw the cracks in the soil.
After that, I highlighted the crack drawn earlier by using the Selection Tool.
Next, I clicked on Objects and then selected Tranform.
Click on Reflect, from there, select the Vertical option and click OK.
[as shown in image]

On a new layer named Ricebowl, I made 3 sublayers named Paddymotive, bowl and crack.
Under Paddymotive sublayer, I made another 3 sublayers named Stem, Leaves and Grain.
Under the Leaves sub-sublayer, I used pen tool to draw the leaves and duplicate [copy & paste]

The same process is repeated for the Stem and Grain
I group the separated rice grains together to ease selecting in future.

Using pen tool, I draw a crack on the lower part of the bowl.
Fill: Peridot, Stroke: Black

At this stage, I wanted to make the sun look more fiery 8D!
So, I duplicate the sunray and transform them.
Different shades of yelllow and orange is used here.
 Using the pentool, I draw a bit of shadow for the bowl or else it'll look too plain ^^;;
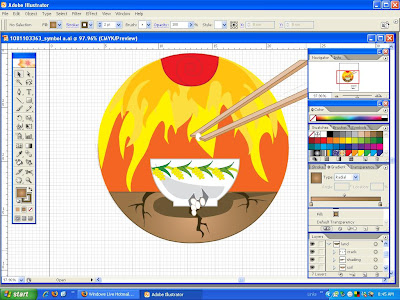
 Using pentool, I draw parts for 1 chopstick and duplicate them.
Then, I rotate them 10 degrees for the other chopstick.
Go to Objects tab and Transform, then to Rotate.
[as shown in image]
 Using ellipse tool, I draw grains of rice and duplicate them again and again. I rotated each grain of rice and positioned them accordingly til I'm happy with the result.
 Using the Spiral tool under Line Segment tool, I formed a spiral for the core of the sun.
Then I use Warp tool to position it nicely.
Then I use ellipse tool for the outline of the symbol.
Fill: None, Stroke: Black
I explored more colour option especially gradient tool.
Then, I use gaucassion blur for the shadows
[Effect->blur->gaucassion blur]
All in all, I've used 6 main layers:
Template
Background
Sun
Land
Ricebowl
Chopstick&Rice
So, I duplicate the sunray and transform them.
Different shades of yelllow and orange is used here.
 Using the pentool, I draw a bit of shadow for the bowl or else it'll look too plain ^^;;
 Using pentool, I draw parts for 1 chopstick and duplicate them.
Then, I rotate them 10 degrees for the other chopstick.
Go to Objects tab and Transform, then to Rotate.
[as shown in image]
 Using ellipse tool, I draw grains of rice and duplicate them again and again. I rotated each grain of rice and positioned them accordingly til I'm happy with the result.
 Using the Spiral tool under Line Segment tool, I formed a spiral for the core of the sun.
Then I use Warp tool to position it nicely.
Then I use ellipse tool for the outline of the symbol.
Fill: None, Stroke: Black

I explored more colour option especially gradient tool.
Then, I use gaucassion blur for the shadows
[Effect->blur->gaucassion blur]
All in all, I've used 6 main layers:
Template
Background
Sun
Land
Ricebowl
Chopstick&Rice
No comments:
Post a Comment